How to export PowerPoint slides as high-resolution images
June 28, 2023
/
1 min


Sometimes we need to export our PowerPoint slides as high-resolution images (JPEG or PNG format). This can be useful for when you are going to print slides, or upscale them for larger displays. The problem is that the default export resolution for images in PowerPoint is very low. To adjust this, you need to do some technical magic on your Windows PC. But it's very simple to get done, and you only need to do it once on your computer.
Here's how to change the export resolution setting
Step 1: Change the Export Resolution Setting
Close PowerPoint and other Windows-based programs
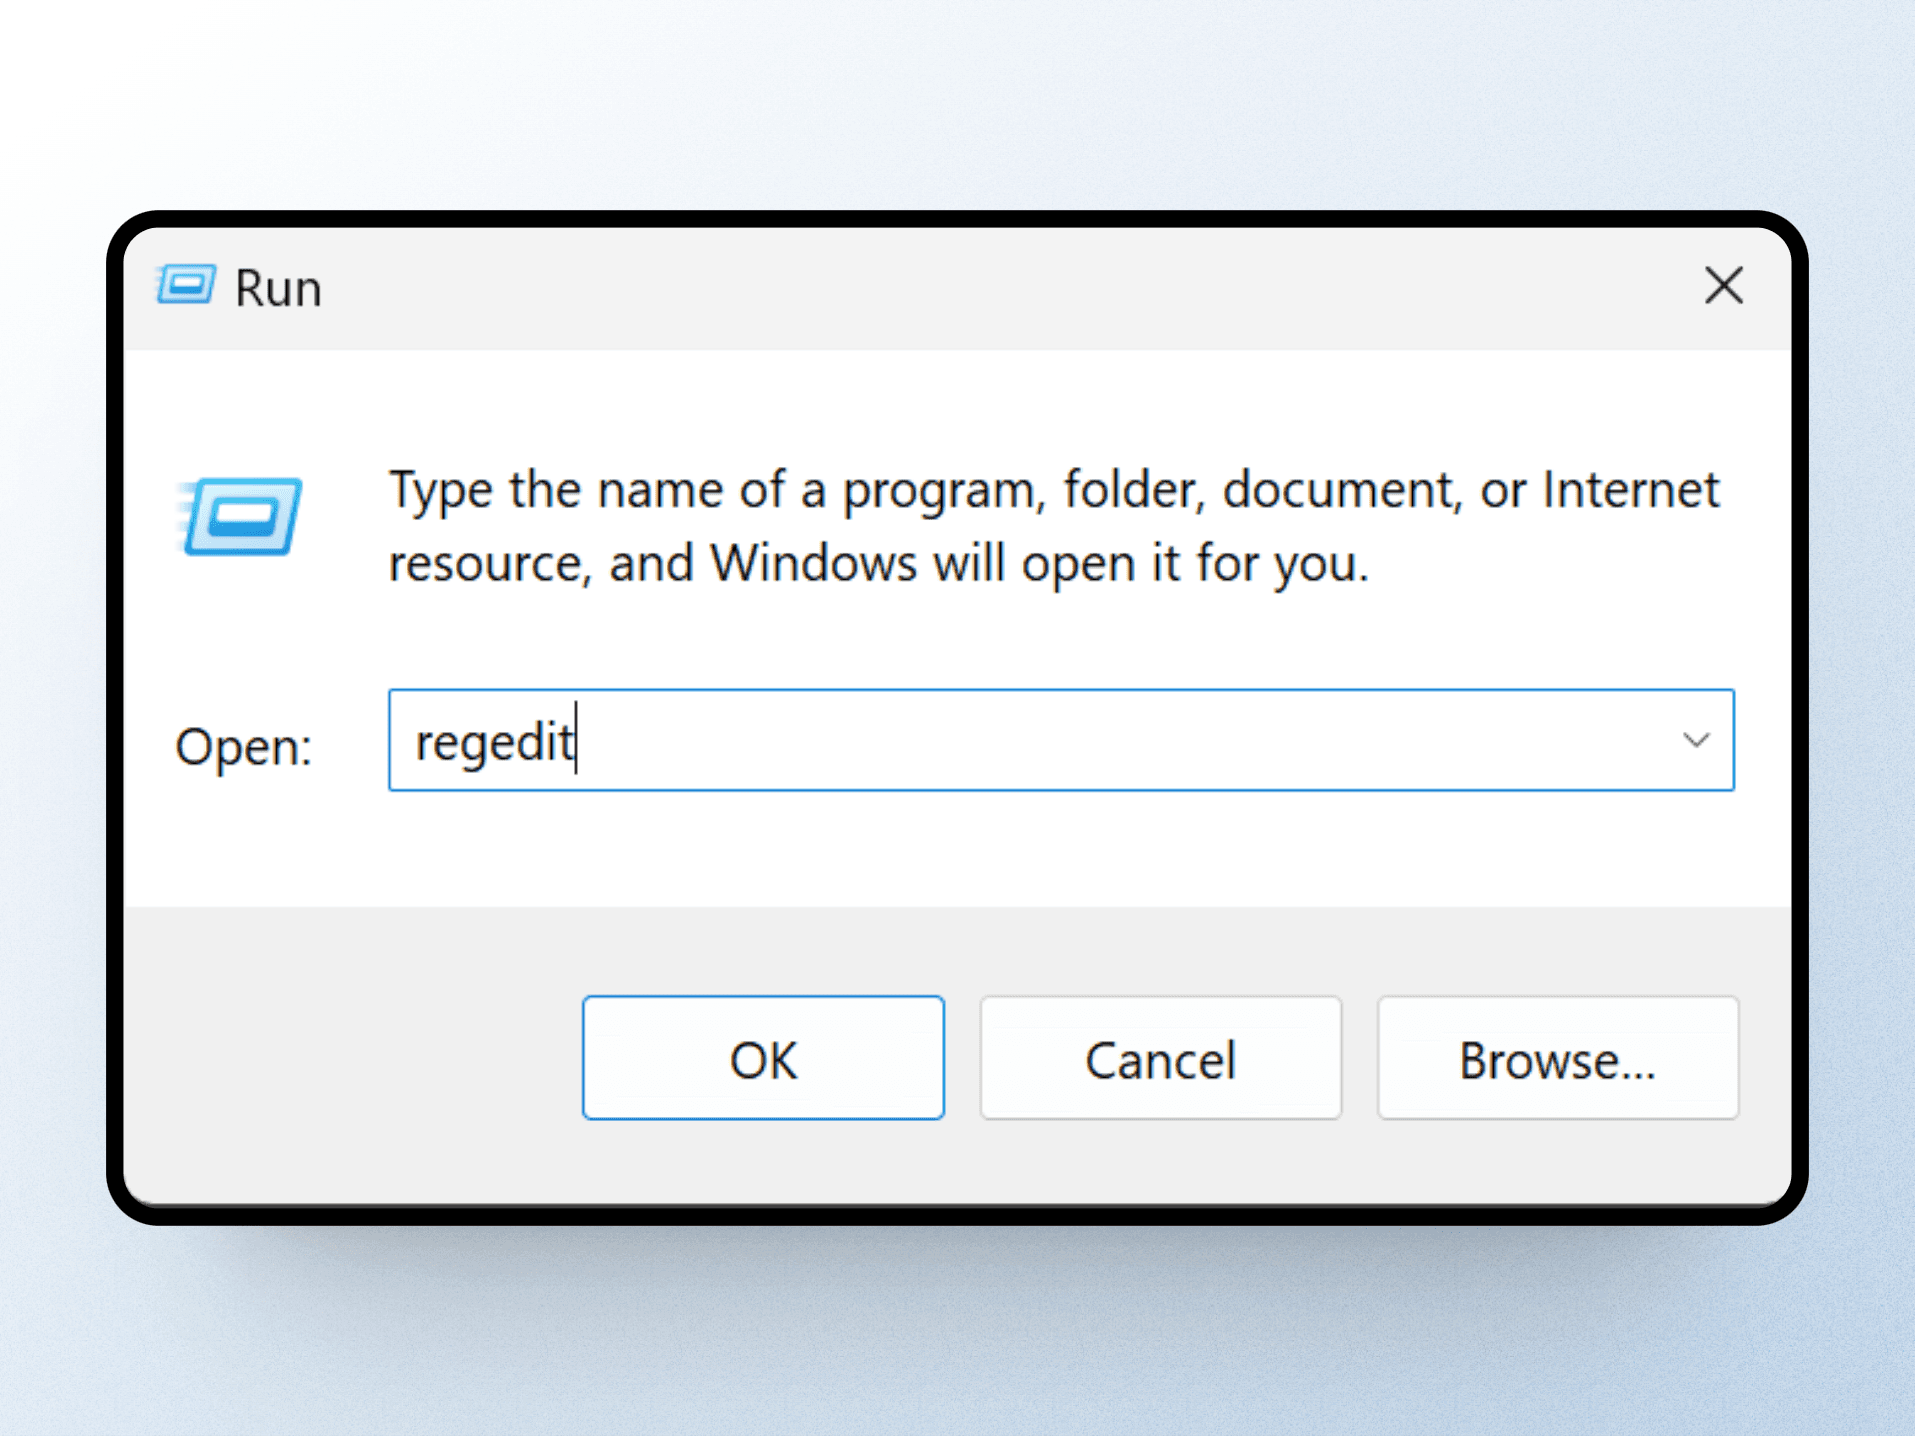
Right-click on the Start button and select "Run."
Type
regeditin the Open box and click "OK."

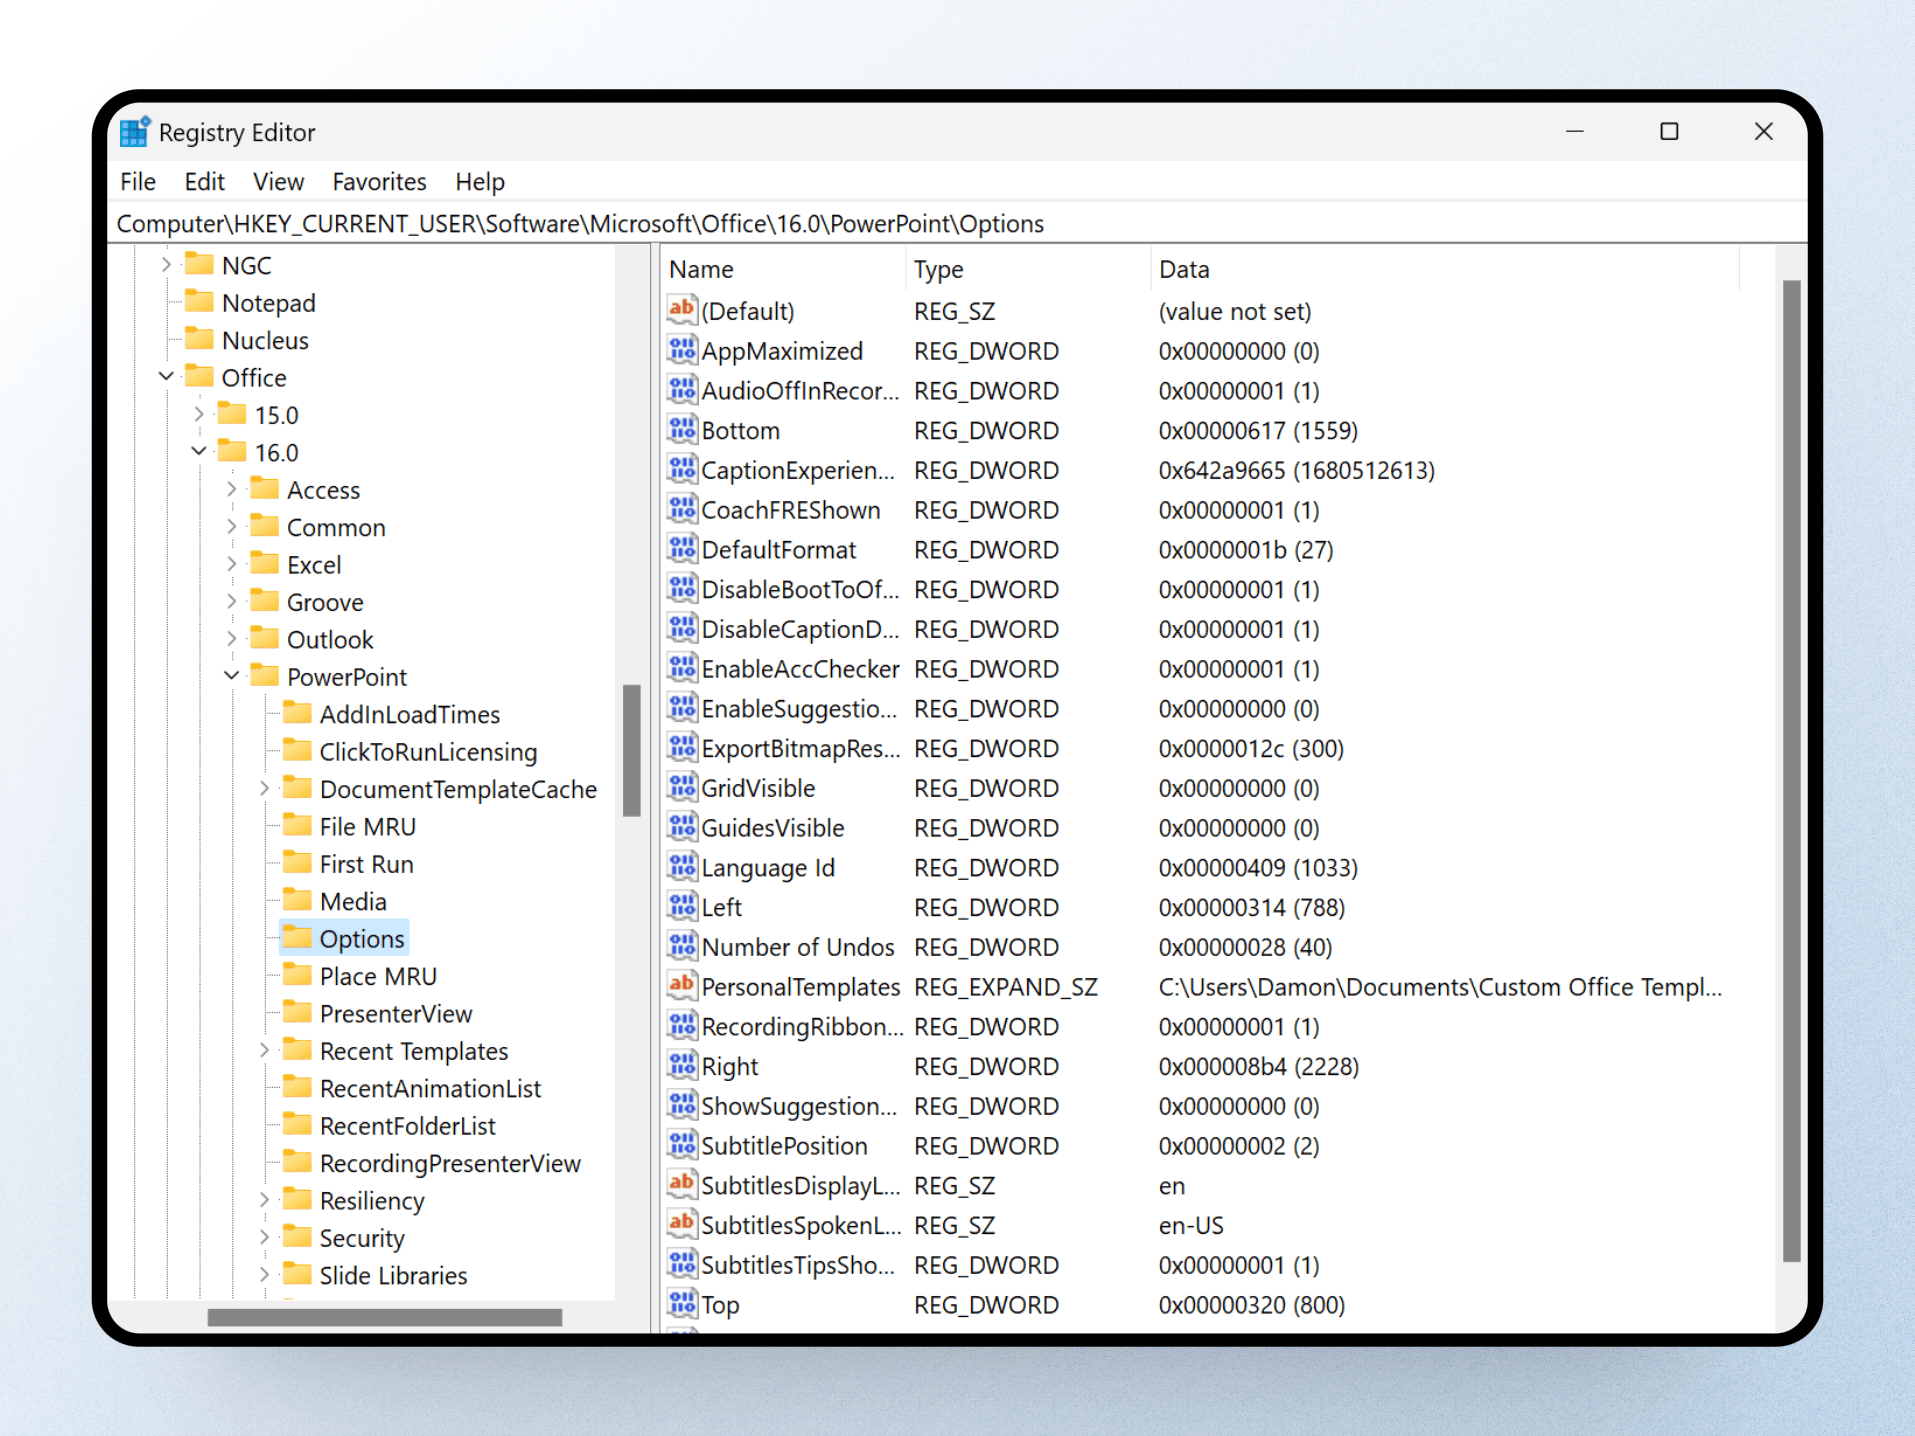
Navigate to the PowerPoint registry subkey. Depending on your version of PowerPoint, locate the appropriate subkey. It will most probably be here:
HKEY_CURRENT_USER\Software\Microsoft\Office\16.0\PowerPoint\Options

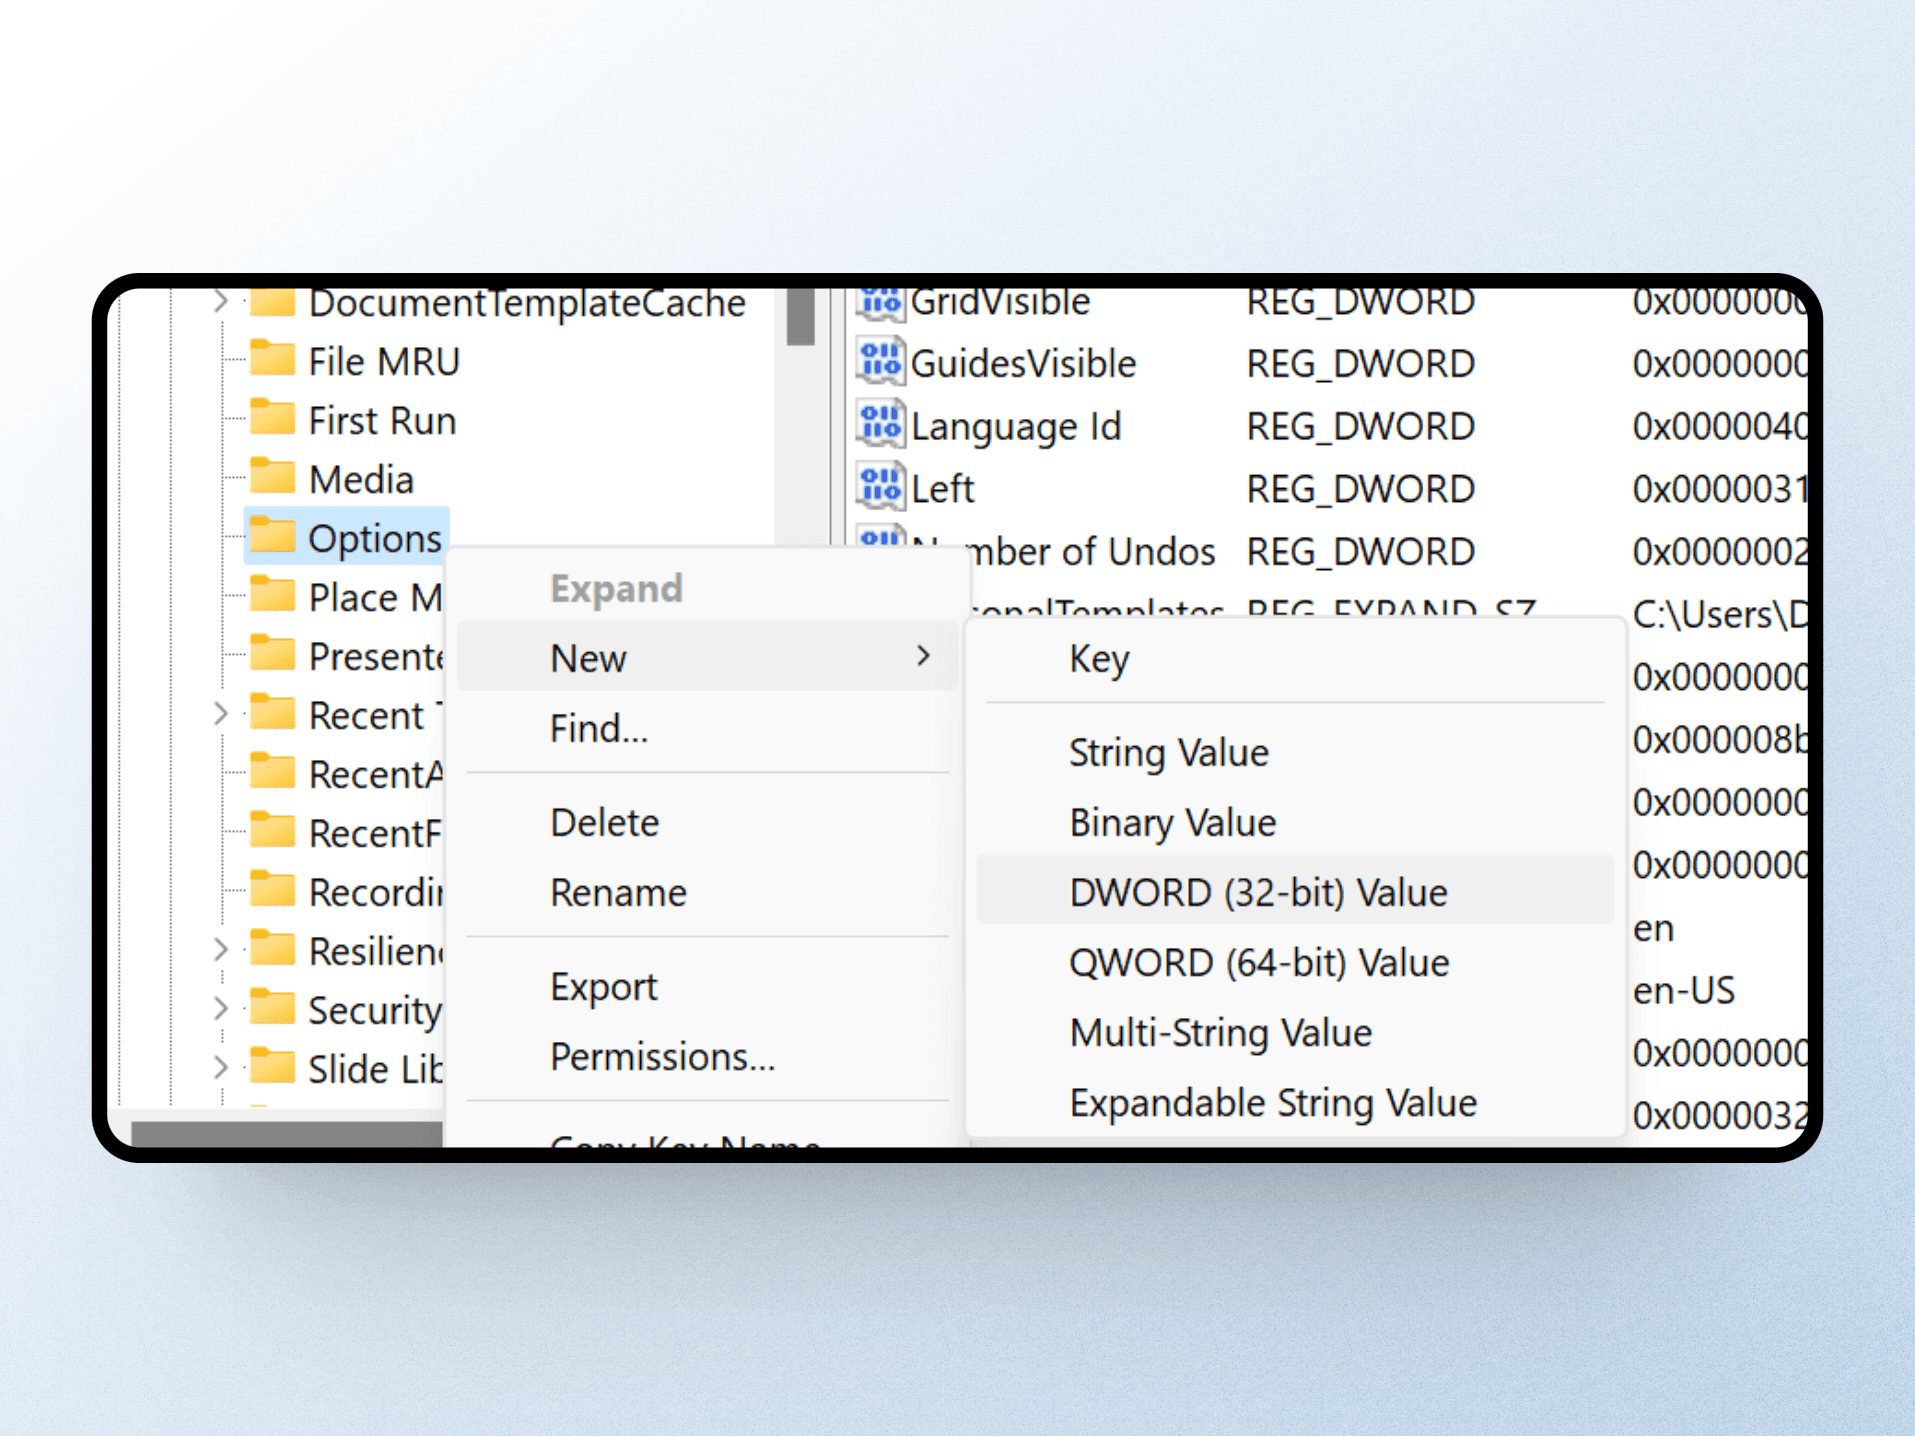
Right-click on the Options subkey, select "New," then "DWORD (32-bit) Value." Name the new value
ExportBitmapResolutionand press Enter.

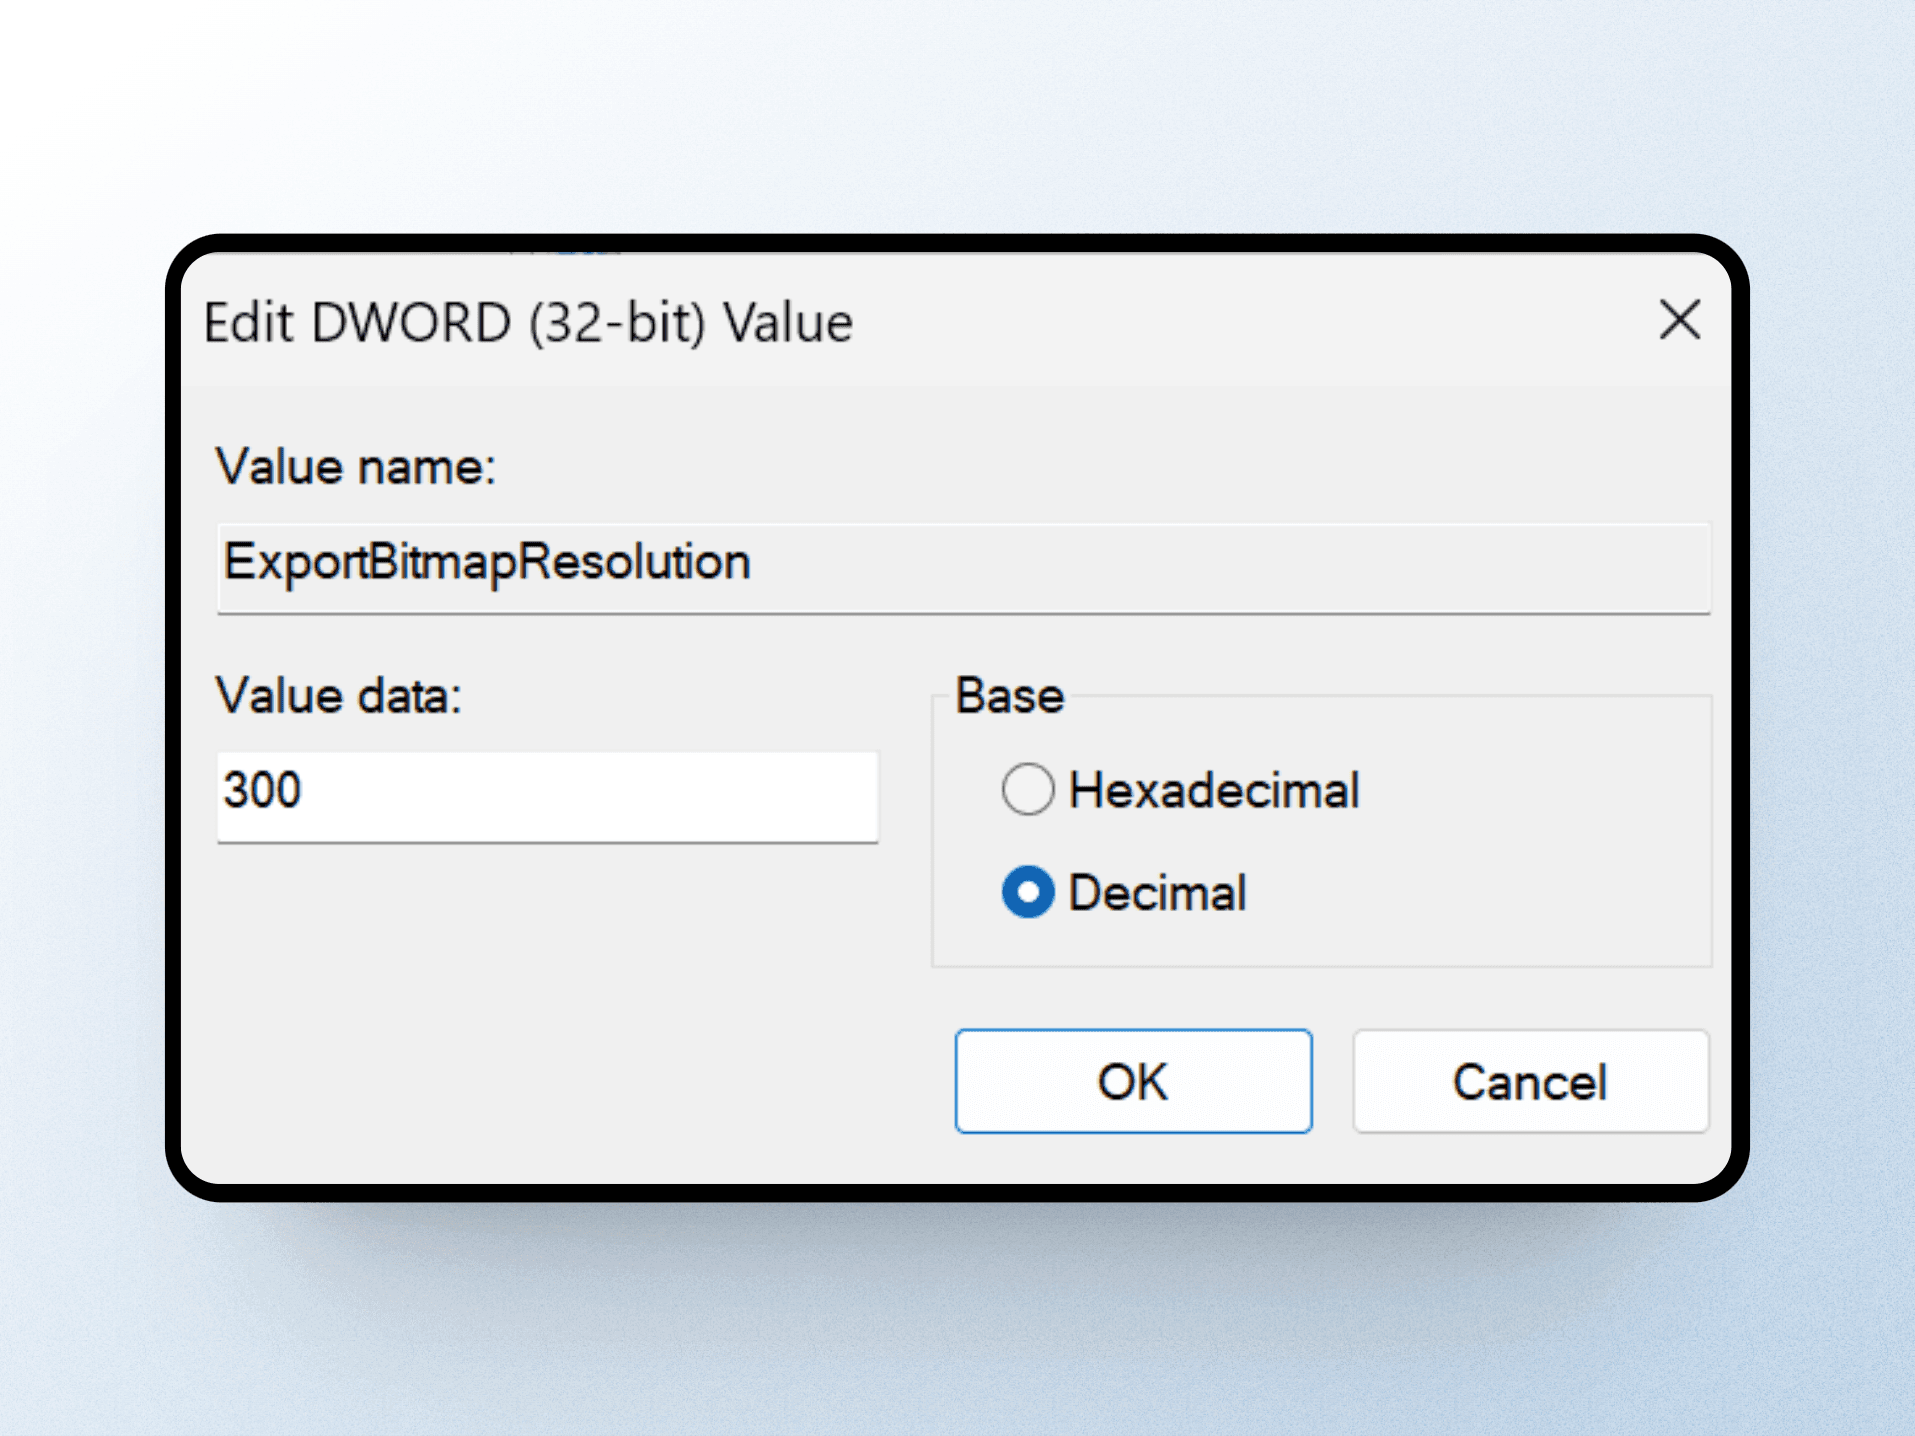
Double-click
ExportBitmapResolutionthat you just created
In the Value dialog box selectDecimaland in the data box, type in300which is 300 DPI resolution (highest).
Click "OK." It should look like below image.

Exit the Registry Editor and restart your computer.
Step 2: Export your slide as a high-resolution image
Open the PowerPoint presentation you want to export as image
Go to
File > Save AsChoose the location to save the file.
In the Save as box, select the image format (e.g. JPEG format).
Click "Save" and select "Just This Slide" or "All Slides"
Your exported slides will now be in high resolution, making them perfect for detailed prints and high-quality displays. You can double-check this by right-clicking any of your exported JPEGs, and under "Details" menu you can see the image resolution.
Sometimes we need to export our PowerPoint slides as high-resolution images (JPEG or PNG format). This can be useful for when you are going to print slides, or upscale them for larger displays. The problem is that the default export resolution for images in PowerPoint is very low. To adjust this, you need to do some technical magic on your Windows PC. But it's very simple to get done, and you only need to do it once on your computer.
Here's how to change the export resolution setting
Step 1: Change the Export Resolution Setting
Close PowerPoint and other Windows-based programs
Right-click on the Start button and select "Run."
Type
regeditin the Open box and click "OK."

Navigate to the PowerPoint registry subkey. Depending on your version of PowerPoint, locate the appropriate subkey. It will most probably be here:
HKEY_CURRENT_USER\Software\Microsoft\Office\16.0\PowerPoint\Options

Right-click on the Options subkey, select "New," then "DWORD (32-bit) Value." Name the new value
ExportBitmapResolutionand press Enter.

Double-click
ExportBitmapResolutionthat you just created
In the Value dialog box selectDecimaland in the data box, type in300which is 300 DPI resolution (highest).
Click "OK." It should look like below image.

Exit the Registry Editor and restart your computer.
Step 2: Export your slide as a high-resolution image
Open the PowerPoint presentation you want to export as image
Go to
File > Save AsChoose the location to save the file.
In the Save as box, select the image format (e.g. JPEG format).
Click "Save" and select "Just This Slide" or "All Slides"
Your exported slides will now be in high resolution, making them perfect for detailed prints and high-quality displays. You can double-check this by right-clicking any of your exported JPEGs, and under "Details" menu you can see the image resolution.
Sometimes we need to export our PowerPoint slides as high-resolution images (JPEG or PNG format). This can be useful for when you are going to print slides, or upscale them for larger displays. The problem is that the default export resolution for images in PowerPoint is very low. To adjust this, you need to do some technical magic on your Windows PC. But it's very simple to get done, and you only need to do it once on your computer.
Here's how to change the export resolution setting
Step 1: Change the Export Resolution Setting
Close PowerPoint and other Windows-based programs
Right-click on the Start button and select "Run."
Type
regeditin the Open box and click "OK."

Navigate to the PowerPoint registry subkey. Depending on your version of PowerPoint, locate the appropriate subkey. It will most probably be here:
HKEY_CURRENT_USER\Software\Microsoft\Office\16.0\PowerPoint\Options

Right-click on the Options subkey, select "New," then "DWORD (32-bit) Value." Name the new value
ExportBitmapResolutionand press Enter.

Double-click
ExportBitmapResolutionthat you just created
In the Value dialog box selectDecimaland in the data box, type in300which is 300 DPI resolution (highest).
Click "OK." It should look like below image.

Exit the Registry Editor and restart your computer.
Step 2: Export your slide as a high-resolution image
Open the PowerPoint presentation you want to export as image
Go to
File > Save AsChoose the location to save the file.
In the Save as box, select the image format (e.g. JPEG format).
Click "Save" and select "Just This Slide" or "All Slides"
Your exported slides will now be in high resolution, making them perfect for detailed prints and high-quality displays. You can double-check this by right-clicking any of your exported JPEGs, and under "Details" menu you can see the image resolution.
Sometimes we need to export our PowerPoint slides as high-resolution images (JPEG or PNG format). This can be useful for when you are going to print slides, or upscale them for larger displays. The problem is that the default export resolution for images in PowerPoint is very low. To adjust this, you need to do some technical magic on your Windows PC. But it's very simple to get done, and you only need to do it once on your computer.
Here's how to change the export resolution setting
Step 1: Change the Export Resolution Setting
Close PowerPoint and other Windows-based programs
Right-click on the Start button and select "Run."
Type
regeditin the Open box and click "OK."

Navigate to the PowerPoint registry subkey. Depending on your version of PowerPoint, locate the appropriate subkey. It will most probably be here:
HKEY_CURRENT_USER\Software\Microsoft\Office\16.0\PowerPoint\Options

Right-click on the Options subkey, select "New," then "DWORD (32-bit) Value." Name the new value
ExportBitmapResolutionand press Enter.

Double-click
ExportBitmapResolutionthat you just created
In the Value dialog box selectDecimaland in the data box, type in300which is 300 DPI resolution (highest).
Click "OK." It should look like below image.

Exit the Registry Editor and restart your computer.
Step 2: Export your slide as a high-resolution image
Open the PowerPoint presentation you want to export as image
Go to
File > Save AsChoose the location to save the file.
In the Save as box, select the image format (e.g. JPEG format).
Click "Save" and select "Just This Slide" or "All Slides"
Your exported slides will now be in high resolution, making them perfect for detailed prints and high-quality displays. You can double-check this by right-clicking any of your exported JPEGs, and under "Details" menu you can see the image resolution.
Sometimes we need to export our PowerPoint slides as high-resolution images (JPEG or PNG format). This can be useful for when you are going to print slides, or upscale them for larger displays. The problem is that the default export resolution for images in PowerPoint is very low. To adjust this, you need to do some technical magic on your Windows PC. But it's very simple to get done, and you only need to do it once on your computer.
Here's how to change the export resolution setting
Step 1: Change the Export Resolution Setting
Close PowerPoint and other Windows-based programs
Right-click on the Start button and select "Run."
Type
regeditin the Open box and click "OK."

Navigate to the PowerPoint registry subkey. Depending on your version of PowerPoint, locate the appropriate subkey. It will most probably be here:
HKEY_CURRENT_USER\Software\Microsoft\Office\16.0\PowerPoint\Options

Right-click on the Options subkey, select "New," then "DWORD (32-bit) Value." Name the new value
ExportBitmapResolutionand press Enter.

Double-click
ExportBitmapResolutionthat you just created
In the Value dialog box selectDecimaland in the data box, type in300which is 300 DPI resolution (highest).
Click "OK." It should look like below image.

Exit the Registry Editor and restart your computer.
Step 2: Export your slide as a high-resolution image
Open the PowerPoint presentation you want to export as image
Go to
File > Save AsChoose the location to save the file.
In the Save as box, select the image format (e.g. JPEG format).
Click "Save" and select "Just This Slide" or "All Slides"
Your exported slides will now be in high resolution, making them perfect for detailed prints and high-quality displays. You can double-check this by right-clicking any of your exported JPEGs, and under "Details" menu you can see the image resolution.
Sometimes we need to export our PowerPoint slides as high-resolution images (JPEG or PNG format). This can be useful for when you are going to print slides, or upscale them for larger displays. The problem is that the default export resolution for images in PowerPoint is very low. To adjust this, you need to do some technical magic on your Windows PC. But it's very simple to get done, and you only need to do it once on your computer.
Here's how to change the export resolution setting
Step 1: Change the Export Resolution Setting
Close PowerPoint and other Windows-based programs
Right-click on the Start button and select "Run."
Type
regeditin the Open box and click "OK."

Navigate to the PowerPoint registry subkey. Depending on your version of PowerPoint, locate the appropriate subkey. It will most probably be here:
HKEY_CURRENT_USER\Software\Microsoft\Office\16.0\PowerPoint\Options

Right-click on the Options subkey, select "New," then "DWORD (32-bit) Value." Name the new value
ExportBitmapResolutionand press Enter.

Double-click
ExportBitmapResolutionthat you just created
In the Value dialog box selectDecimaland in the data box, type in300which is 300 DPI resolution (highest).
Click "OK." It should look like below image.

Exit the Registry Editor and restart your computer.
Step 2: Export your slide as a high-resolution image
Open the PowerPoint presentation you want to export as image
Go to
File > Save AsChoose the location to save the file.
In the Save as box, select the image format (e.g. JPEG format).
Click "Save" and select "Just This Slide" or "All Slides"
Your exported slides will now be in high resolution, making them perfect for detailed prints and high-quality displays. You can double-check this by right-clicking any of your exported JPEGs, and under "Details" menu you can see the image resolution.


Figma Slides: A new presentation tool taking on PowerPoint and co
Figma Slides: A new presentation tool taking on PowerPoint and co
Figma Slides: A new presentation tool taking on PowerPoint and co
Figma Slides: A new presentation tool taking on PowerPoint and co
Figma Slides: A new presentation tool taking on PowerPoint and co
Figma Slides: A new presentation tool taking on PowerPoint and co
Presentation tools
Presentation tools
Presentation tools
Presentation tools
Presentation tools


How to prepare a great conference keynote presentation
How to prepare a great conference keynote presentation
How to prepare a great conference keynote presentation
How to prepare a great conference keynote presentation
How to prepare a great conference keynote presentation
How to prepare a great conference keynote presentation
Public speaking
Public speaking
Public speaking
Public speaking
Public speaking